6.14.2013

Off to Spain I Go

I started writing this post a couple of months ago and honestly, it was cheesy, like whoa, chee-sey.  I'm also 5 days from going and so exhausted from getting ready that I thought I would just start over.


I'M GOING TO SPAIN!!!!!!!


Last December, I attended a meeting at church about an upcoming mission trip to Astorga, Spain.  Mike and I filled out applications, miss over here finally got herself a passport, and in January we found out we were going to Astorga in June.
Can we say beyond excited?!?!

I have always wanted to go to Spain and God finally opened the doors for us to go.  Our team of 13 people is going over to put on a cultural fair for a week.  We will be teaching English classes, cooking classes, various crafts, American sports of volleyball and baseball, family activities and just starting relationships with the people of Astorga.  A missionary couple has started an evangelical church in Ponferrada and are now going to Astorga to start a church there.

I sharing so you can pray for us.  The boys are staying with grandma and grandpa a week and nana and papa the second week.  I would love for my boys to be covered in prayer as we are away for 2 weeks and for Mike and I as we travel.  My biggest concern is not losing my passport and not offending anyone because I don't know the culture.  God is doing AMAZING things in Astorga already and I'm excited to see how God uses our team during our time there.

Look for pictures when I return......

6.10.2013

Catch up Keep up

Oh hey there,

How is it June????  And how is it that school ends next week and I'm off to Spain??  Spain.....  I'll chat more about that later, but I thought I would share a little of what I've been up to since the end of March.

Easter and these yummy rolls that were my contribution to Easter dinner at my in-laws house.

My crew of boys and me.  It was such a rare, sunny Easter day that the boys were able to have an Easter egg hunt outside and my attempt at getting a family picture.  Love my boys :)


Our spring break was the second week in April and the boys and I flew to Denver and then drove to Nana and Papa's house in Oklahoma to spend our vacation with some favorite people of ours.  My husband had to work all week, so the boys and I had an adventure.  Our trip was a lot of fun.  I got to hang out with my mom and dad and my aunt a couple of days.  My grandpa came over a few nights to have dinner with us as well.  He is the last grandparent on my side and my boys loved seeing him.


The flight to Denver was uneventful, we had a great 7 1/2 hour drive to Oklahoma, I got to have pedicures with my best friend who drove 2 1/2 hours to see me and had lunch with another friend that lives back home as well.  My cousin from Ft Worth drove up and we had a mini family reunion.  The trip home was another story......  

Great drive up to Denver, only took us 7 hours to get back.  Made it to the airport and had some wonderful people help me get luggage and car seats to the check in area.  Treated the boys with ice cream and then walked down to our gate and got on board the plane.  Well, 30 minutes after we were supposed to have departed, we got off the plane and had to wait until another plane could arrive in Denver to take us back to Seattle, because the plane had mechanical issues and Alaska decided to rather be safe than sorry and for that I do appreciate the delay.

However....instead of getting home at 8pm Seattle time, it was 1 am.  My saving grace was the fact that my wonderful husband was meeting us at the airport to take us home.  Kiddo got an extra day off from school as we all slept in on Monday.


Another great part of April is Opening Day!!!!  Since the official opening day of the Seattle Mariners was the day we flew out to OK, the Mariners held an open house the first day of the season when the M's were playing in Oakland.  (So thoughtful of them :) The Mariner organization opened the gates to anyone who wanted to come in, played the game on the massively gargantuan jumbo tron they installed during the off season and just had a fun evening showing off the new food vendors and updates to the stadium.  If you ever come to Seattle, try to make it to an M's game, we have an awesome stadium :)


May brings flowers and a month long party of birthdays.  Seriously, August was a great month for so many people as there are so many birthdays that month.  I should know, our oldest was born the day before my birthday!  I got my favorite birthday gift in the mail from Vera Bradley, went out for happy hour with some of my best girlfriends up here, went out for Mexican with my family and of course celebrated my 8 year old!


Happy hour with my girlfriends at one of my favorite restaurants, Lot No 3.


Y'all it was in the 80s on my birthday!!!!!  So we headed to the lake with some friends and I got sunburned.....  It was an awesome day.


Mother's Day is the week after my birthday and I sure am thankful for these 3 boys and blessed to be their mother.


I ran into a girlfriend of mine who lives 40 minutes away so sadly, I barely see her, but God just made sure we intersected because she has a little guy who is turning 1 in June and I blessed her socks off with an entire bin of 12-18 months summer clothes for her little guy.  It was so much fun to go through the bin of clothes and remember a 2 of my 3 boys wearing those little outfits and now another little boy gets to wear them.  I am also one less bin of stuff in my house.  Score!


I have been reading a couple of blogs and they do hair tutorials.  I have such long hair and for once in my 36 years of life am trying to be a little more girly and "do" my hair.  I also get loads of complements on those earrings from noonday collection.


Our family spent Memorial Day at the baseball game.  The Mariner's even won, too!!


So that brings you up to speed on what I've been up to and maybe I'll be better about posting, but most likely not :)  I just wanted to share some fun I've had and the blessings I've been given.

3.28.2013

Flower Baubles Necklace

I have been in a slump lately, one that involves designing jewelry.  I've been busy quilting away and madly trying to finish up a quilt before I leave town for spring break.  As I was reading some of the blogs that are on my reader, one of the gals tossed out an idea for a resin baubles challenge and I thought why not.  Of course, I said yes before I made the trek to Michael's to find the said beads, but luckily I found the designated package and my little helper picked out the package of pink and purple.  The other choice was a spring green and teal which would have been fun too.

I purchased the package, brought it home and began playing with it.  This necklace was super fast to put together and I like how it came out.  I used crimp beads to keep everything in its place and attached a lobster clasp and jump rings to finish it off.

Thank you Lorelei for the challenge and I look forward to seeing everyone's creations.


Don't you just love these little globes?  Amazing how from the side 
they are clear but from the top, the color shows through.


A close up of these beauties


Coming soon to my etsy store.....

If you feel like blog hopping, here are the other participants

3.18.2013

Guinness Brownies

My husband had poker on Friday night and while I was hoping to make cupcakes for the guys, home all day with 3 boys gave me a headache so I mustered up enough strength to make brownies...from a mix.

Sigh....

I'm such a brat about mixes but I have to say the Ghirardelli brownie mix is pretty stinking good. I did substitute the water for Guinness beer and sent then on the way to poker night. The guys loved them, my girlfriends were tweeting how good they were or that poker should be at another friends house because then she could have brownies. I was like, y'all the brownies came from a mix. So I thought I would share my crazy Guinness brownies.

Recipe:
Box of Ghiradelli brownie mix
1/3 cup Guinness
1/3 cup vegetable oil
1 egg

Following the directions from the box, substitute the water for the Guinness and continue with the directions. Pour into an 8x8 baking dish that has been throughly greased and bake for 35-40 min. You need to bake it a little less than the box states. Mine were crunchy on the outside & gooey, yummy in the middle.

3.06.2013

No More #diyproject

There are blessings and curses of being a stay at home mom and one of those curses are the lovely, pushy sales people who go door knocking for a living.  One too many meat salesmen and tree cutters and I had had my fill.  It was time to look for a no soliciting sign to adorn my front step.

Enter the wonderful world of Etsy......

I searched out no soliciting signs to place outside and discovered a lot of great ones.  Some are funny, like this one, this one and this one.

Some are basic, but pretty, like this one, this one and this one.

I decided to go with this sign and turn it into a little DIY project.  I bought an 11x4 piece of craft wood at Michael's, spray painted it silver and once it was dried, I added a layer of eggplant alcohol ink using a sponge paint brush and once that was dry, I followed the directions on applying the vinyl sign.


I hot glued silver ribbon to the back and made the ribbon long enough that if I wanted to add a wreath outside, I could and you could still see the sign.  Now I need a pretty wreath to adorn my front window area next to my front door.

2.28.2013

Coconut Vanilla Pot de Creme #baketogether

I am joining Abby Dodge for another #baketogether this month featuring Vanilla Creme de Pots.  Since my youngest can't have dairy, I thought I would use coconut milk in place of the half and half.  The coconut flavor is so incredibly subtle as these pots are definitely vanilla.  I used both a vanilla pod and vanilla sugar when making these and I think it just ups the ante on the vanilla flavoring without being over powering.


Look at all those yummy vanilla specks of flavor.


I made the strawberry sauce since I had everything on hand and wow, that sauce is so good.  I added some to my greek yogurt this morning for breakfast and may add it to my strawberry cupcakes for a baby shower this weekend.  I'm kind of surprised my boys didn't see me scarf down my little pot of heaven after snapping pictures.  It was so good.  The next time I will try with the half and half for my husband and me since the recipe only makes 4 and that way, the two of us can have dessert after the boys go to bed. 

slightly adapted from Abby Dodge

Coconut Vanilla Creme de Pots with Double Strawberry Sauce
Makes 4 servings and 1 1/3 cup sauce.
For the pots of heaven:
1 vanilla bean split or 1 1/2 teaspoons pure vanilla extract or paste
1 3/4 cup canned coconut milk (buy the full fat coconut milk, like Chaokoh)
5 large egg yolks
1/4 cup (1 3/4 ounces) granulated sugar (I used vanilla sugar)
1/8 teaspoon table salt
For the strawberry sauce:
1 package (10 ounces) frozen strawberries, thawed
1/4 cup strawberry jam (I use seedless)
1/4 – 1/2 cups (1 to 2 ounces) confectioners’ sugar
Pinch of table salt
To make the pots:
1.Measure the coconut milk in a 2-cup glass measure.
2. Position the vanilla bean on a cutting board and, using the tip of a sharp knife, split the bean lengthwise down the middle. Slide the edge of the knife down the cut side of each piece of the bean to release the seeds. Add the seeds and vanilla bean pieces to the coconut milk. Heat the mixture in the microwave until very hot, 2 to 3 minutes. Cover and let the mixture steep 30 or up to 2 hours. The longer the coconut milk and the vanilla bean and seeds steep, the more pronounced the vanilla flavor.
3. Position the oven rack on the middle rung. Heat the oven to 325°F. Arrange four 6-ounce ramekins in a baking pan with 2-inch high sides. I use my 8-inch square baking pan.
4. In a small saucepan, whisk the yolks, sugar and salt until well blended.(Don’t let them sit or the eggs will begin to break down.)  Uncover the coconut milk and, whisking, slowly pour the coconut milk (with the vanilla bean pieces) into the yolk mixture. Whisk until well blended. Cook over medium-low heat, stirring constantly with a spoon or heat-proof spatula, until thickened and coats the back of a spoon or spatula (170-172°F on an instant read or candy thermometer), about 4 to 5 minutes.
5. Slide the pan from the heat and fish out the vanilla bean and scrape any custard from the pod back into the custard. Stir in vanilla extract or paste, if using.  Pour the custard into the ramekins (for a super-clean pot filling, I like to pour the custard back into the 2-cup measure and then pour it from there into the ramekins – the pour spout makes it so easy.) Carefully fill the baking pan with hot tap water to come halfway up the sides of the ramekins and cover the pan loosely with foil.
6. Bake until the pot de crèmes wiggle like jello when nudged, 35 to 45 minutes depending on thickness of the ramekin walls. Transfer the baking pan to a rack let cool completely. Cover with plastic wrap and refrigerate at least 4 hours or up to 2 days before serving.
To make the strawberry sauce:
1. Combine the thawed strawberries, jam, 1/4 cup (1 ounce) confectioners’ sugar and the salt  in a food processor or blender. Whiz until pureed and well blended. Taste and add a touch more sugar if needed. Press through a fine-meshed sieve if you want a seedless sauce.
To serve:
1. Spoon a little of the custard out  of the center  -don’t go for perfect – and pour a little sauce into the cavity. Serve the remaining sauce on the side.

2.27.2013

Neon Sunshine Necklace

I have been playing around with different materials in my jewelry making for awhile now and I have to say, it's been a lot of fun mixing paper and vinyl with my metals.  This necklace is white vinyl flowers from the Beadin Path and the paper flowers were from a jar of scrapbooking flowers I picked up at Michael's for a completely different craft project last summer.  


The chain is silver plated and 21 inches long. Since neon is still trending, you might find a few additions in my shop soon.


More pics can be found in my Etsy store.


2.26.2013

Sausage Calzone - freezer meals


I'm part of a group of gals who get together about every 6 weeks and swap freezer meals.  Two of us have kiddos with dairy allergies and a few have nut allergies but we do pretty good to label those foods that contain the allergens so the little ones don't get sick.


 For one of the meal swaps, I chose to make sausage calzones for the group and I made a pepperoni and sausage calzone that was dairy free for the other family.  I had made these calzones ages ago and just recently decided to pull out the recipe and quadruple it.  I only needed 6 meals and ended up with 10 calzones.  Sister needs to work on her math skills a bit.


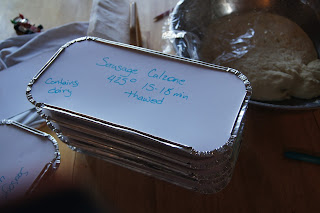
 I set up a little station of pizza dough, the sausage ricotta filling, mozzarella cheese, a flat baking sheet to roll out the dough and make the calzones and olive oil to spread out the dough.  I put the baking tin in front of me so I would make sure the calzone would fit in the tin.


I use this pizza dough recipe, mixed ricotta, cooked sausage, garlic, parsley, red pepper flakes and parmesan cheese in a large bowl.  After spreading out the dough to the desired size, on the bottom half of the pizza dough add a layer of ricotta mixture then top with mozzarella cheese.


 Fold over the top of the dough onto the bottom and fold and pinch the edges to seal them.  Using your hands or two spatulas, transfer calzone to the baking tin, add the top and write what it is, bake time at what temperature and once completed, add to the freezer.


I'm glad that I ended up with a few extra for my freezer because I have used them for a couple with a brand new baby, sent one to a neighbor who had broken her collar bone and another for a night when I seriously have no idea or motivation for dinner.

Sausage Calzones
makes 2 large calzones, serves 6-8

Pizza dough
olive oil
1 lb of Italian sausage
2 cups of ricotta cheese
1/2 of parmesan cheese
2 garlic cloves, minced
1/4 c of parsley, chopped
1/4 tsp red pepper flakes  (optional)
fresh ground pepper
2 c mozzarella cheese
Favorite marinara sauce for dipping

Preheat oven to 450 degrees.

Brown sausage in a small skillet until cooked through and into small crumbles, drain on a paper towel lined plate.

In a large bowl, combine sausage, ricotta cheese, parm cheese, garlic, parsley, red pepper flakes if using and a few grinds of pepper.  On a lightly greased baking sheet, spread half of the pizza dough to cover the entire sheet.  On the lower half of the dough, spread half of the ricotta sausage mixture and then top with 1 cup of mozzarella cheese.  Take the top half of the dough and bring it towards you to cover the filling. Start at one end and take the bottom dough and fold up to the top of the dough and pinch to close.  Go around the entire calzone to make sure all the filling is safely secured and won't ooze out when baking.  Transfer the calzone to another lightly greased baking sheet.  Take the second half of the dough and make another calzone using the same steps as above.  Transfer that calzone to the baking sheet with the first calzone and place in the oven.

Bake for 20-25 minutes until golden brown.  Warm up your favorite marinara sauce and serve on the side.  Cut each calzone into 6 slices and serve.

**You could also take the second calzone and wrap it in plastic and aluminum foil before baking and place it into the freezer for another day.  Take the frozen calzone out of the freezer, defrost in the fridge and then bake as directed.  You may need a few extra minutes if your calzone is still a little frozen in the middle.

adapted from Rachael Ray 30 minute meals 2


2.13.2013

Love Me Some Coffee in a Pretty Mug #VDAYMUGSWAP

Happy Valentine's Day Y'all!!


I had the priviledge of joining Caroline and Alissa in the 2nd annual Valentine Swap and this year was as much fun as last year.  This years theme was a mug swap.  Each participate was paired with another blogger or instagrammer to swap Valentine goodies.  We were encouraged to send along a lovely mug and could also include whatever favorite drink and goodies.

My mug swap partner is the lovely Libbi from Life is Funner. She blogs about her life and does book reviews, so if you are ever in need of a book recommendation, hit up her blog :)  She sent me a box full of yummies and goodies and I have a funny story to share about the whole thing too.


Let's just say, my dog is lucky to still be alive.....

Our goal, set by Alissa and Caroline was to get our boxes sent out by Friday, Feb 1 in order for the USPS to do its job and that we would have enough time to blog, instagram and social media the entire event.  My box was delayed, but I did receive Libbi's box on the 1st and challenged myself not to open the box until mine was on its way to Colorado.  Sadly, the box was not on a very high shelf and was in my studio on my cutting table and the dog decided it smelled too yummy to not drag the box into his crate and rip it to shreds.


As you can see, all the very, yummy, homemade items were completely devoured by the dog.  To say I was sad is an understatement.  The dog was placed on permanent outside status for the remainder of the day until the husband came home to rescue him.

I managed to save the rest and put them up high and away in the kitchen where they actually belong.  Libbi sent me a beautiful green mug (love the dots!!), some yummy dark chocolate and sour patch candy, a package of Cookie Doodle coffee and a variety of teas.  There is also a beautifully packaged jar of Russian tea, which I have not had in a very long time.


So despite my sad state of the package and the loss of the homemade goodies, I'm thrilled with my mug swap.  Thank you Libbi!!


Linking up with Alissa & Caroline for the #VDAYMUGSWAP

2.12.2013

Valentine Garland

I found this super cute garland idea from Pinterest (of course) and when I went to clink on the link, it's in Japanese and this girl speaks Zero Japanese, but......there were pictures and pictures speak in any language.  If I was a smart girl I would have taken pictures and done a DIY on how to make your own garland, but I did this project over the course of two weeks and I have mommy brain.


So I'll just give you the picture of my sad wall that needs updated pictures to include all 3 children and not just the oldest.  It was a fun project and honestly could be done within an hour start to finish.